 安全概览
安全概览
# 12.1 Spring Security 介绍
Spring Security 以“The Acegi Secutity System for Spring” 的名字始于 2003 年年底。第一个正式版本 1.0.0 版发布于 2006 年 5 月。Acegi 在 2007 年年底,正式成为 spring 组合项目,被更名为“Spring Security”。
现在,Spring Security 成为了一个强大而又活跃的开源社区。 在 Spring Security 支持论坛上有成千上万的信息。 有一个积极的核心开发团队专职进行开发,一个积极的社区定期共享补丁并支持他们的同伴。
Spring Security (opens new window) 是一个功能强大、高度可定制的身份验证和访问控制框架。它是保护基于 Spring 应用的事实上的标准。当前最新版本为 5.2.1.RELEASE (opens new window) 版。
Spring Security 是一个专注于为 Java 应用程序提供身份验证和授权的框架。与所有 Spring 项目一样,Spring Security 的真正威力在于它可以很容易地扩展来满足定制化需求。
其特性有:
- 全面和可扩展的身份验证和授权支持;
- 防止会话固定攻击、点击劫持、伪造跨站点请求等攻击;
- Servlet API 集成;
- 与 Spring Web MVC 的可选集成;
- 更多…
会话固定攻击(session fixation attack)是利用应用系统在服务器的会话 ID 固定不变机制,借助他人用相同的会话 ID 获取认证和授权,然后利用该会话 ID 劫持他人的会话以成功冒充他人,造成会话固定攻击。
下面我们对 Spring Security 原理进行简要的分析。
# 12.1.1 过滤器链
SpringSecurity 采用的是责任链的设计模式,它有一条很长的过滤器链。现在对这条过滤器链的各个进行说明:
WebAsyncManagerIntegrationFilter:将 Security 上下文与 Spring Web 中用于处理异步请求映射的 WebAsyncManager 进行集成。
SecurityContextPersistenceFilter:在每次请求处理之前将该请求相关的安全上下文信息加载到 SecurityContextHolder 中,然后在该次请求处理完成之后,将 SecurityContextHolder 中关于这次请求的信息存储到一个“仓储”中,然后将 SecurityContextHolder 中的信息清除,例如在 Session 中维护一个用户的安全信息就是这个过滤器处理的。
HeaderWriterFilter:用于将头信息加入响应中。
CsrfFilter:用于处理跨站请求伪造。
LogoutFilter:用于处理退出登录。
UsernamePasswordAuthenticationFilter:用于处理基于表单的登录请求,从表单中获取用户名和密码。默认情况下处理来自 /login 的请求。从表单中获取用户名和密码时,默认使用的表单 name 值为 username 和 password,这两个值可以通过设置这个过滤器的 usernameParameter 和 passwordParameter 两个参数的值进行修改。
DefaultLoginPageGeneratingFilter:如果没有配置登录页面,那系统初始化时就会配置这个过滤器,并且用于在需要进行登录时生成一个登录表单页面。
BasicAuthenticationFilter:检测和处理 http basic 认证。
RequestCacheAwareFilter:用来处理请求的缓存。
SecurityContextHolderAwareRequestFilter:主要是包装请求对象 request。
AnonymousAuthenticationFilter:检测 SecurityContextHolder 中是否存在 Authentication 对象,如果不存在为其提供一个匿名 Authentication。
SessionManagementFilter:管理 session 的过滤器
ExceptionTranslationFilter:处理 AccessDeniedException 和 AuthenticationException 异常。
FilterSecurityInterceptor:可以看做过滤器链的出口。
RememberMeAuthenticationFilter:当用户没有登录而直接访问资源时, 从 cookie 里找出用户的信息, 如果 Spring Security 能够识别出用户提供的 remember me cookie, 用户将不必填写用户名和密码, 而是直接登录进入系统,该过滤器默认不开启。
# 12.1.2 流程
先来看下面一个 Spring Security 执行流程图,只要把 SpringSecurity 的执行过程弄明白了,这个框架就会变得很简单:
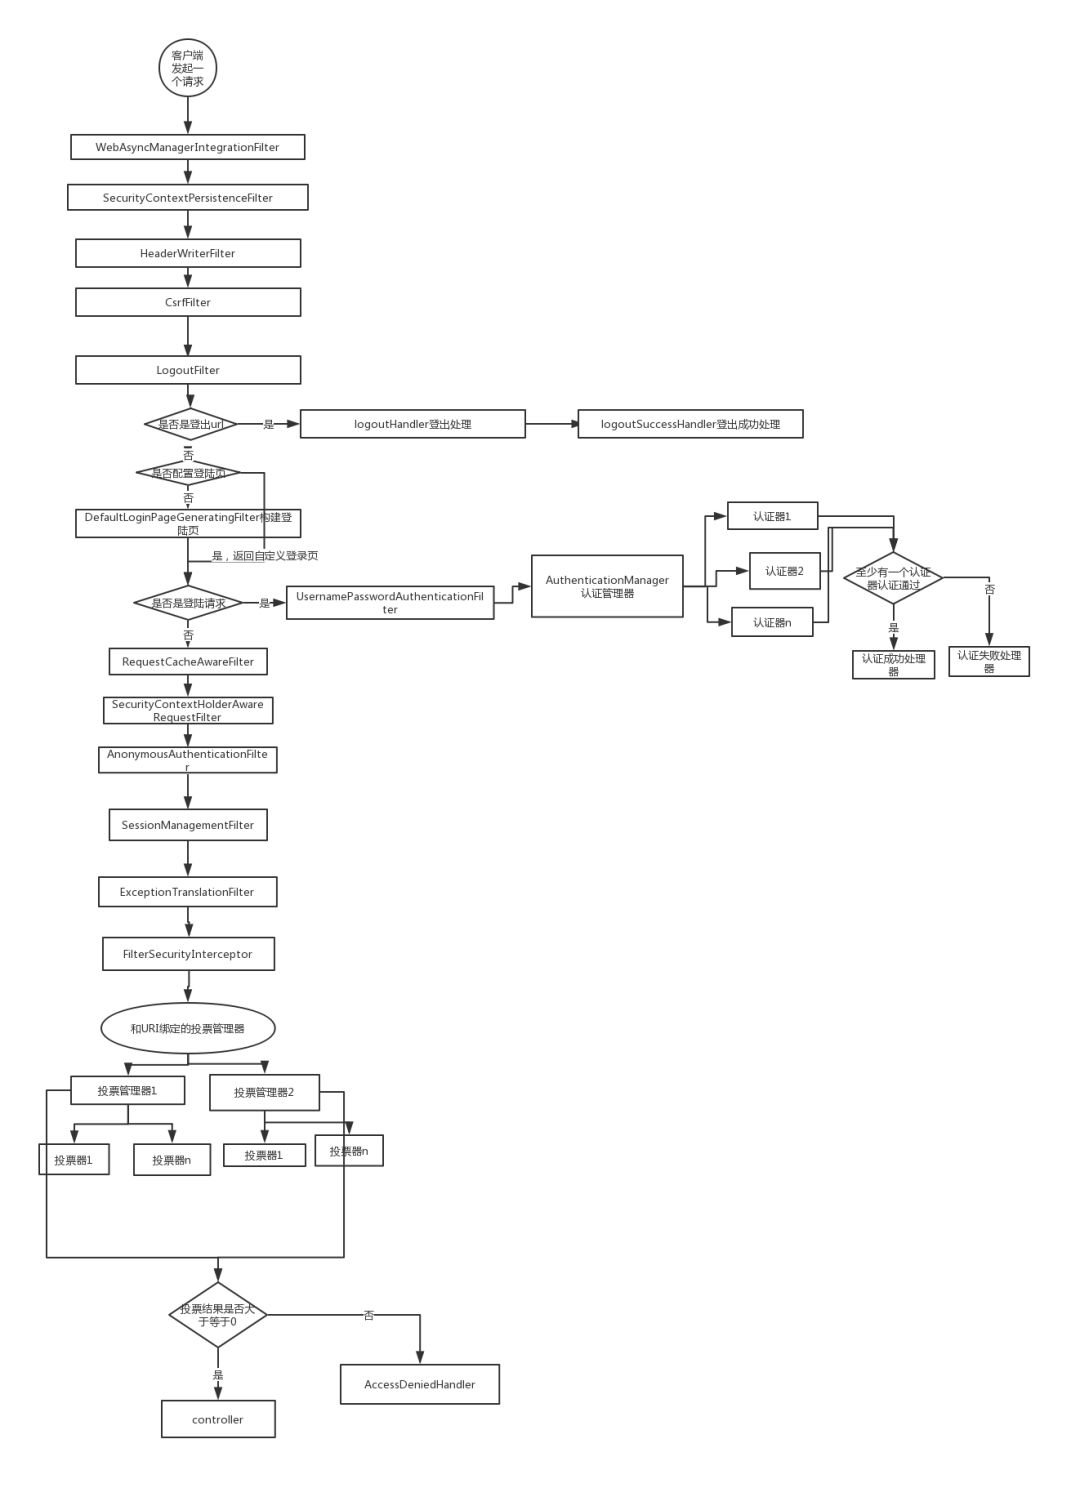
客户端发起一个请求,进入 Security 过滤器链。
当到 LogoutFilter 的时候判断是否是登出路径,如果是登出路径则到 logoutHandler ,如果登出成功则到 logoutSuccessHandler 登出成功处理,如果登出失败则由 ExceptionTranslationFilter ;如果不是登出路径则直接进入下一个过滤器。
当到 UsernamePasswordAuthenticationFilter 的时候判断是否为登录路径,如果是,则进入该过滤器进行登录操作,如果登录失败则到 AuthenticationFailureHandler 登录失败处理器处理,如果登录成功则到 AuthenticationSuccessHandler 登录成功处理器处理,如果不是登录请求则不进入该过滤器。
当到 FilterSecurityInterceptor 的时候会拿到 uri ,根据 uri 去找对应的鉴权管理器,鉴权管理器做鉴权工作,鉴权成功则到 Controller 层否则到 AccessDeniedHandler 鉴权失败处理器处理。
# 12.1.3 配置
在 WebSecurityConfigurerAdapter 这个类里面可以完成上述流程图的所有配置。
配置类伪代码:
@Configuration
@EnableWebSecurity
public class SecurityConfig extends WebSecurityConfigurerAdapter {
    @Override
    protected void configure(AuthenticationManagerBuilder auth) throws Exception {
        auth.userDetailsService(userDetailService).passwordEncoder(new BCryptPasswordEncoder());
    }
    @Override
    public void configure(WebSecurity web) throws Exception {
        web.ignoring().antMatchers("/resources/**/*.html", "/resources/**/*.js");
    }
    @Override
    protected void configure(HttpSecurity http) throws Exception {
       http
       .formLogin()
       .loginPage("/login_page")
       .passwordParameter("username")
       .passwordParameter("password")
       .loginProcessingUrl("/sign_in")
       .permitAll()
       .and().authorizeRequests().antMatchers("/test").hasRole("test")
       .anyRequest().authenticated().accessDecisionManager(accessDecisionManager())
       .and().logout().logoutSuccessHandler(new MyLogoutSuccessHandler())
       .and().csrf().disable();
       http.addFilterAt(getAuthenticationFilter(),UsernamePasswordAuthenticationFilter.class);
       http.exceptionHandling().accessDeniedHandler(new MyAccessDeniedHandler());
       http.addFilterAfter(new MyFittler(), LogoutFilter.class);
    }
}
2
3
4
5
6
7
8
9
10
11
12
13
14
15
16
17
18
19
20
21
22
23
24
25
26
27
28
29
配置简介
configure(AuthenticationManagerBuilder auth)
AuthenticationManager 的建造器,配置 AuthenticationManagerBuilder 会让Security 自动构建一个 AuthenticationManager(该类的功能参考流程图);如果想要使用该功能你需要配置一个 UserDetailService 和 PasswordEncoder。UserDetailsService 用于在认证器中根据用户传过来的用户名查找一个用户,PasswordEncoder 用于密码的加密与比对,我们存储用户密码的时候用PasswordEncoder.encode() 加密存储,在认证器里会调用 PasswordEncoder.matches() 方法进行密码比对。如果重写了该方法,Security 会启用 DaoAuthenticationProvider 这个认证器,该认证就是先调用 UserDetailsService.loadUserByUsername 然后使用 PasswordEncoder.matches() 进行密码比对,如果认证成功成功则返回一个 Authentication 对象。
configure(WebSecurity web)
这个配置方法用于配置静态资源的处理方式,可使用 Ant 匹配规则。
configure(HttpSecurity http)
这个配置方法是最关键的方法,也是最复杂的方法。我们使用代码展开来介绍:
http
.formLogin()
.loginPage("/login_page")
.passwordParameter("username")
.passwordParameter("password")
.loginProcessingUrl("/sign_in")
.permitAll()
1
2
3
4
5
6
7这是配置登录相关的操作从方法名可知,配置了登录页请求路径,密码属性名,用户名属性名,和登录请求路径,permitAll()代表任意用户可访问。
http
.authorizeRequests()
.antMatchers("/test").hasRole("test")
.anyRequest().authenticated()
.accessDecisionManager(accessDecisionManager());
1
2
3
4
5以上配置是权限相关的配置,配置了一个 /test url 该有什么权限才能访问, anyRequest() 表示所有请求,authenticated() 表示已登录用户才能访问, accessDecisionManager() 表示绑定在 url 上的鉴权管理器
为了对比,现在贴出另一个权限配置清单:
http.authorizeRequests()
.antMatchers("/tets_a/**","/test_b/**").hasRole("test")
.antMatchers("/a/**","/b/**").authenticated()
.accessDecisionManager(accessDecisionManager())
1
2
3
4我们可以看到权限配置的自由度很高,鉴权管理器可以绑定到任意 url 上;而且可以硬编码各种 url 权限:
http
.logout()
.logoutUrl("/logout")
.logoutSuccessHandler(new MyLogoutSuccessHandler())
1
2
3
4登出相关配置,这里配置了登出 url 和登出成功处理器:
http
.exceptionHandling()
.accessDeniedHandler(new MyAccessDeniedHandler());
1
2
3上面代码是配置鉴权失败的处理器。
http.addFilterAfter(new MyFittler(), LogoutFilter.class);
http.addFilterAt(getAuthenticationFilter(),UsernamePasswordAuthenticationFilter.class);
1
2上面代码展示如何在过滤器链中插入自己的过滤器,addFilterBefore 加在对应的过滤器之前,addFilterAfter 加在对应的过滤器之后,addFilterAt 加在过滤器同一位置,事实上框架原有的 Filter 在启动 HttpSecurity 配置的过程中,都由框架完成了其一定程度上固定的配置,是不允许更改替换的。根据测试结果来看,调用 addFilterAt 方法插入的 Filter ,会在这个位置上的原有 Filter 之前执行。
关于 HttpSecurity 使用的是链式编程,其中 http.xxxx.and.yyyyy 这种写法和 http.xxxx;http.yyyy 写法意义一样。
自定义 AuthenticationManager 和 AccessDecisionManager
重写 authenticationManagerBean() 方法,并构造一个 authenticationManager:
@Override
public AuthenticationManager authenticationManagerBean() throws Exception {
    ProviderManager authenticationManager = new ProviderManager(Arrays.asLis(getMyAuthenticationProvider(),daoAuthenticationProvider()));
    return authenticationManager;
}
1
2
3
4
5我这里给 authenticationManager 配置了两个认证器,执行过程参考流程图。
定义构造AccessDecisionManager的方法并在配置类中调用,配置参考 configure(HttpSecurity http) 说明:
public AccessDecisionManager accessDecisionManager(){
    List<AccessDecisionVoter<? extends Object>> decisionVoters
            = Arrays.asList(
            new MyExpressionVoter(),
            new WebExpressionVoter(),
            new RoleVoter(),
            new AuthenticatedVoter());
    return new UnanimousBased(decisionVoters);
}
1
2
3
4
5
6
7
8
9投票管理器会收集投票器投票结果做统计,最终结果大于等于0代表通过;每个投票器会返回三个结果:-1(反对),0(通过),1(赞成)。
# 12.1.4 权限系统
UserDetails
Security 中的用户接口,我们自定义用户类要实现该接口。
GrantedAuthority
Security 中的用户权限接口,自定义权限需要实现该接口:
public class MyGrantedAuthority implements GrantedAuthority {
    private String authority;
}
1
2
3authority 表示权限字段,需要注意的是在 config 中配置的权限会被加上 ROLE_ 前缀,比如我们的配置
authorizeRequests().antMatchers("/test").hasRole("test"),配置了一个 test 权限但我们存储的权限字段(authority)应该是 ROLE_test 。UserDetailsService
Security 中的用户 Service,自定义用户服务类需要实现该接口:
@Service
public class MyUserDetailService implements UserDetailsService {
    @Override
    public UserDetails loadUserByUsername(String s) throws UsernameNotFoundException {
      return.....
    }
}
1
2
3
4
5
6
7loadUserByUsername的作用在上文中已经说明,就是根据用户名查询用户对象。
SecurityContextHolder
用户在完成登录后 Security 会将用户信息存储到这个类中,之后其他流程需要得到用户信息时都是从这个类中获得,用户信息被封装成 SecurityContext ,而实际存储的类是 SecurityContextHolderStrategy ,默认的SecurityContextHolderStrategy 实现类是 ThreadLocalSecurityContextHolderStrategy 它使用了ThreadLocal来存储了用户信息。
手动填充 SecurityContextHolder 示例:
UsernamePasswordAuthenticationToken token = new UsernamePasswordAuthenticationToken("test","test",list);
SecurityContextHolder.getContext().setAuthentication(token);
1
2对于使用 token 鉴权的系统,我们就可以验证token后手动填充SecurityContextHolder,填充时机只要在执行投票器之前即可,或者干脆可以在投票器中填充,然后在登出操作中清空SecurityContextHolder。
# 12.1.5 扩展
Security 可扩展的有:
鉴权失败处理器
验证器
登录成功处理器
投票器
自定义token处理过滤器
登出成功处理器
登录失败处理器
自定义 UsernamePasswordAuthenticationFilter
鉴权失败处理器
Security 鉴权失败默认跳转登录页面,我们可以实现 AccessDeniedHandler 接口,重写 handle() 方法来自定义处理逻辑;然后参考配置类说明将处理器加入到配置当中。
验证器
实现 AuthenticationProvider 接口来实现自己验证逻辑。需要注意的是在这个类里面就算你抛出异常,也不会中断验证流程,而是算你验证失败,我们由流程图知道,只要有一个验证器验证成功,就算验证成功,所以你需要留意这一点。
登录成功处理器
在 Security 中验证成功默认跳转到上一次请求页面或者路径为 "/" 的页面,我们同样可以自定义:继承 SimpleUrlAuthenticationSuccessHandler 这个类或者实现 AuthenticationSuccessHandler 接口。我这里建议采用继承的方式,SimpleUrlAuthenticationSuccessHandler 是默认的处理器,采用继承可以契合里氏替换原则,提高代码的复用性和避免不必要的错误。
投票器
投票器可继承 WebExpressionVoter 或者实现 AccessDecisionVoter接口;WebExpressionVoter 是 Security 默认的投票器;我这里同样建议采用继承的方式;添加到配置的方式参考 上文;
注意:投票器 vote 方法返回一个int值;-1代表反对,0代表弃权,1代表赞成;投票管理器收集投票结果,如果最终结果大于等于0则放行该请求。
自定义token处理过滤器
自定义 token 处理器继承自 OncePerRequestFilter 或者 GenericFilterBean 或者 Filter 都可以,在这个处理器里面需要完成的逻辑是:获取请求里的 token,验证 token 是否合法然后填充 SecurityContextHolder ,虽然说过滤器只要添加在投票器之前就可以,但我这里还是建议添加在 http.addFilterAfter(new MyFittler(), LogoutFilter.class);
登出成功处理器
实现LogoutSuccessHandler接口,添加到配置的方式参考上文。
登录失败处理器
登录失败默认跳转到登录页,我们同样可以自定义。继承 SimpleUrlAuthenticationFailureHandler 或者实现 AuthenticationFailureHandler,建议采用继承。
自定义UsernamePasswordAuthenticationFilter
我们自定义UsernamePasswordAuthenticationFilter可以极大提高我们 Security的灵活性(比如添加验证验证码是否正确的功能)。
我们直接继承 UsernamePasswordAuthenticationFilter ,然后在配置类中初始化这个过滤器,给这个过滤器添加登录失败处理器,登录成功处理器,登录管理器,登录请求 url 。
这里配置略微复杂,贴一下代码清单
初始化过滤器:
MyUsernamePasswordAuthenticationFilte getAuthenticationFilter(){
    MyUsernamePasswordAuthenticationFilter myUsernamePasswordAuthenticationFilter = new MyUsernamePasswordAuthenticationFilter(redisService);
    myUsernamePasswordAuthenticationFilter.setAuthenticationFailureHandler(new MyUrlAuthenticationFailureHandler());
    myUsernamePasswordAuthenticationFilter.setAuthenticationSuccessHandler(new MyAuthenticationSuccessHandler());
    myUsernamePasswordAuthenticationFilter.setFilterProcessesUrl("/sign_in");
    myUsernamePasswordAuthenticationFilter.setAuthenticationManager(getAuthenticationManager());
    return myUsernamePasswordAuthenticationFilter;
}
1
2
3
4
5
6
7
8添加到配置:
http.addFilterAt(getAuthenticationFilter(),UsernamePasswordAuthenticationFilter.class);1
# 12.1.6 总结
对于 Security 的扩展配置关键在于 configure(HttpSecurityhttp) 方法;扩展认证方式可以自定义 authenticationManager 并加入自己验证器,在验证器中抛出异常不会终止验证流程;扩展鉴权方式可以自定义 accessDecisionManager 然后添加自己的投票器并绑定到对应的 url(url 匹配方式为 ant)上,投票器 vote(Authenticationauthentication,FilterInvocationfi,Collection<ConfigAttribute>attributes) 方法返回值为三种:-1 0 1,分别表示反对弃权赞成。
对于 token 认证的校验方式,可以暴露一个获取的接口,或者重写 UsernamePasswordAuthenticationFilter 过滤器和扩展登录成功处理器来获取 token,然后在 LogoutFilter 之后添加一个自定义过滤器,用于校验和填充 SecurityContextHolder。
另外,Security 的处理器大部分都是重定向的,我们的项目如果是前后端分离的话,我们希望无论什么情况都返回 json ,那么就需要重写各个处理器了。
以上“Spring Security 原理分析”部分内容来自于Spring Security 工作原理概览 (opens new window),感谢CSDN博主“_江南一点雨 (opens new window)”。